... why all my links and other info is now situated beneath all the posts rather than beside them???? I can't find out how to get it back to where it was a few days ago and am finding it sooooooo aggravating.
I'll send a small painting to the first person who can successfully tell me how to fix this!
Saturday, May 31, 2008
Does anyone know ......
fresh plants ......
Well, I haven't yet got to the teabag paintings (they're turning me into a 'bag lady) due to some other pressing weekend things such as housework, baking homemade bread and making some homemade soup, etc. It's been raining cats and dogs here and on cool, rainy days, I love to bake and fill the house with the smells.
But shortly! I've got some ideas for the 'bags. I'll post as soon as I do.
In the meantime, taking a cue from Ann, I'm posting some shots of my corner of the world. I guess you could say it's a *type* of artwork.
The front entrance, which needs some painting and work after such a totally rough winter with freshly planted pots of pansies. What struck me so much about these flowers when shopping all the greenhouses was the brilliant oranges! And since I love purple so much, I just had to mix a few of those in with the oranges. Like the mat? I'm such an introverted person......
Another garden of freshly planted flowers - this time it's mums with a white geranium every foot or so along with a bluish/purple border. Quite a change from my usual choices of cooler colours such as pinks, blues, etc. Unfortunately, a week later, all these mums look like they're dying. If they don't perk up soon, I"m taking them all out and putting something else in this garden - in pots!
Some chives in an old bonsai tree planter. The tree died several years ago but I saved the planter. Once these are more established, I plan on painting them.
Back to a bit more housework, then painting.....
Sunday, May 18, 2008
Am I crazy? Another teabag painting?
More colour on the grisaille pears
It's a holiday weekend here in Canada - The Victoria Day Weekend, which is traditionally the time to plant gardens. It's been a really busy weekend so far, gardening, housework, pool vacuuming, yard work. It's another sunny day today so planting is on the horizon. Yesterday though,I did do some painting. I'm posting another step in the grisaille pears and hopefully, more will follow today.
This one has two washes of DS burnt orange with some WN burnt umber dropped in the shadow areas. Today, I'll add some more yellow and burnt umber, then the red and green. I've been trying to save the highlight areas but I think I'll have to put in some white gouache or white acrylic. I want the highlights to really stand out and the lifted ones here don't really.
This past week, I received some awesome info material from Winsor Newton, thanks to Ian Maginnis at Winsor Newton! The hand painted colour charts are great and the info on how to use each of the mediums is very helpful. I have several and it seems I've been using them wrong, which would explain why I could never get anything out of them. There's also brush info, and much more info and colour charts on oils and gouache and acrylics, too. Thanks, Ian!
Hope you're all having a great weekend!
Sunday, May 11, 2008
Next step in the Grisaille Pears
I added some very watery Prussian Blue to a few areas, then a coat of Hansa Yellow Medium. While the paint was still wet, using a thirsty brush, I lifted a few highlights.
Almost three weeks ago now, I badly sprained my foot! I didn't step down when I should have. Baaaaaaaad mistake. After going to emergency to make sure it wasn't broken, I hobbled around on crutches for a few days (crutches are for the birds!), then graduated to one crutch (which was so much easier), then finally to none. Several people have told me that a bad sprain is worse than a break. I now believe them. When I first went to the hospital that night, my blood pressure had soared to 211 over 109! It set the alarm off on the bp machine it was so high. The doctor believed it was the pain causing that and he was right. The next day, it was well on it's way back down. The bruising on the foot has been unbelievable!
So, almost three weeks later, I'm still hobbling around - but without crutches. The worst part is when I'm sitting. Boy, does that foot swell when I'm sitting. It's getting better slowly though, but that's why I haven't been doing much painting or blogging.
I'm still on ibuprofen for the swelling. I really hate that stuff - it does very nasty things to my stomach - but if I stop taking it, my foot swells too much and that causes so much more pain.
To top that all off, I'm just getting over a cold which I caught about a week after the sprain. Probably because my resistance must have been low.
So, the foot's on the mend, the cold's almost gone. Things are looking up!
Painting with Teabags
In the latest issue of Watercolor Magazine, there was a creativity article on painting with teabags by Wendy Hill. To get back into the swing of things, I tried it. With this cold, I've been drinking a lot more tea so I quickly saved the ten teabags needed. Ten used teabags.
Some things I learned about painting with teabags;
1. Lay the teabags out flat and separately while saving them. I just kept adding mine to a bowl and the ones on the bottom were moldy when I went to use them. (Though, ticklingly, the bowl of used teabags really grossed my two boys out. That alone excused the moldiness for me.)
2. Used teabags STINK. I mean, they stink to high heaven!!! I had to open a window in my painting room because I couldn't take the smell anymore. At first, I thought that @#$% Moose had found another way to torment me, but no. He was out in the hallway, not even coming in the room. (He usually curls up around my feet while I paint.)
3. Dried teabags suck up a LOT of paint so you need to have a lot ready.
4. Have that paint ready in bowls or containers because the teabags break and the next thing you know, you have those tea grains all over the place - in your paint brushes, in your paint wells, everywhere. AFter finishing, I had some major cleanup to do!
Here's a few pics of the process:
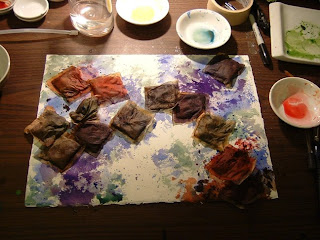
First, you had to wet your paper, leaving some dry spots for whites. Then, splatter and drop in and drip paint in places. Place teabags on wet paint. (At this point, you don't notice the smell. lol)
Next, you add juicy paint to the teabags. (THIS is where the smell starts to waft upwards! We're not talking the sweaty socks smell of wet Arches paper you sometimes get, either. We're talking STINK. Horrible stink!) Those dried teabags can sure suck up a lot of paint! Let them dry.
The next photo shows the reason you put your paint in bowls or containers. So that you don't dip brushes full of tea back into the paint wells. ;o)
This is what I have now. Do I see anything in this? Not yet, except for the little fetal warrior in the upper right corner. The smell has fogged my vision for seeing anything other than that. I've thrown the teabags out, opened the windows to freshen this room up and will get back to it.
Would I do this again? Probably not. (Edit: A later note: I did, though!)
I've put some paint on the pear grisaille. I'll put that in a new post! Coming right up .......
In the meantime, would anyone like a cup of tea? (Don't worry, the teabags would be fresh and new. LOL.)